
Microsoft Azure Mailboxes
Learn how to buy and set up Microsoft Azure mailboxes through InboxKit on SmartReach. Get a domain and 50 mailboxes for $35/month with automated DNS setup.
SmartReach partners with InboxKit to provide fully managed Microsoft Azure mailboxes for cold email outreach. These accounts come with automated domain setup, built-in warmup, and seamless integration with SmartReach campaigns.
Why Azure mailboxes?
- Affordable Bundle Pricing - Get a domain + 50 mailboxes for just $35/month.
- Fully Managed Setup- No manual DNS configuration required. InboxKit handles SPF, DKIM, and DMARC records automatically.
- Microsoft Azure Trust - Azure-hosted mailboxes benefit from Microsoft’s sender reputation infrastructure.
- Built-in Warmup - All purchased mailboxes automatically go through a 14-day warmup period to build domain reputation.
- Domain Redirection- Your purchased domains automatically redirect visitors to your main website.
- Bulk Mailbox Creation- Add up to 50 mailboxes per domain, either manually or via CSV upload.
Plan Requirements
- InboxKit Azure purchases require a Plus tier subscription or higher
Pricing
| Feature | Cost |
|---|---|
| Domain + 50 Mailboxes (Bundle) | $35/month |
All mailboxes are included in the bundle price. No additional per-mailbox charges.
Why do top lead generation agencies prefer Azure although it's expensive from a sending volume perspective?
Top agencies prioritize total cost of ownership over per-email costs. Azure delivers 80-90% reduction in domain management overhead, complete client isolation preventing cross-contamination, superior longterm deliverability, and professional positioning with enterprise clients. These benefits that far outweigh higher sending costs.
How to Purchase InboxKit Azure Domains & Email Accounts
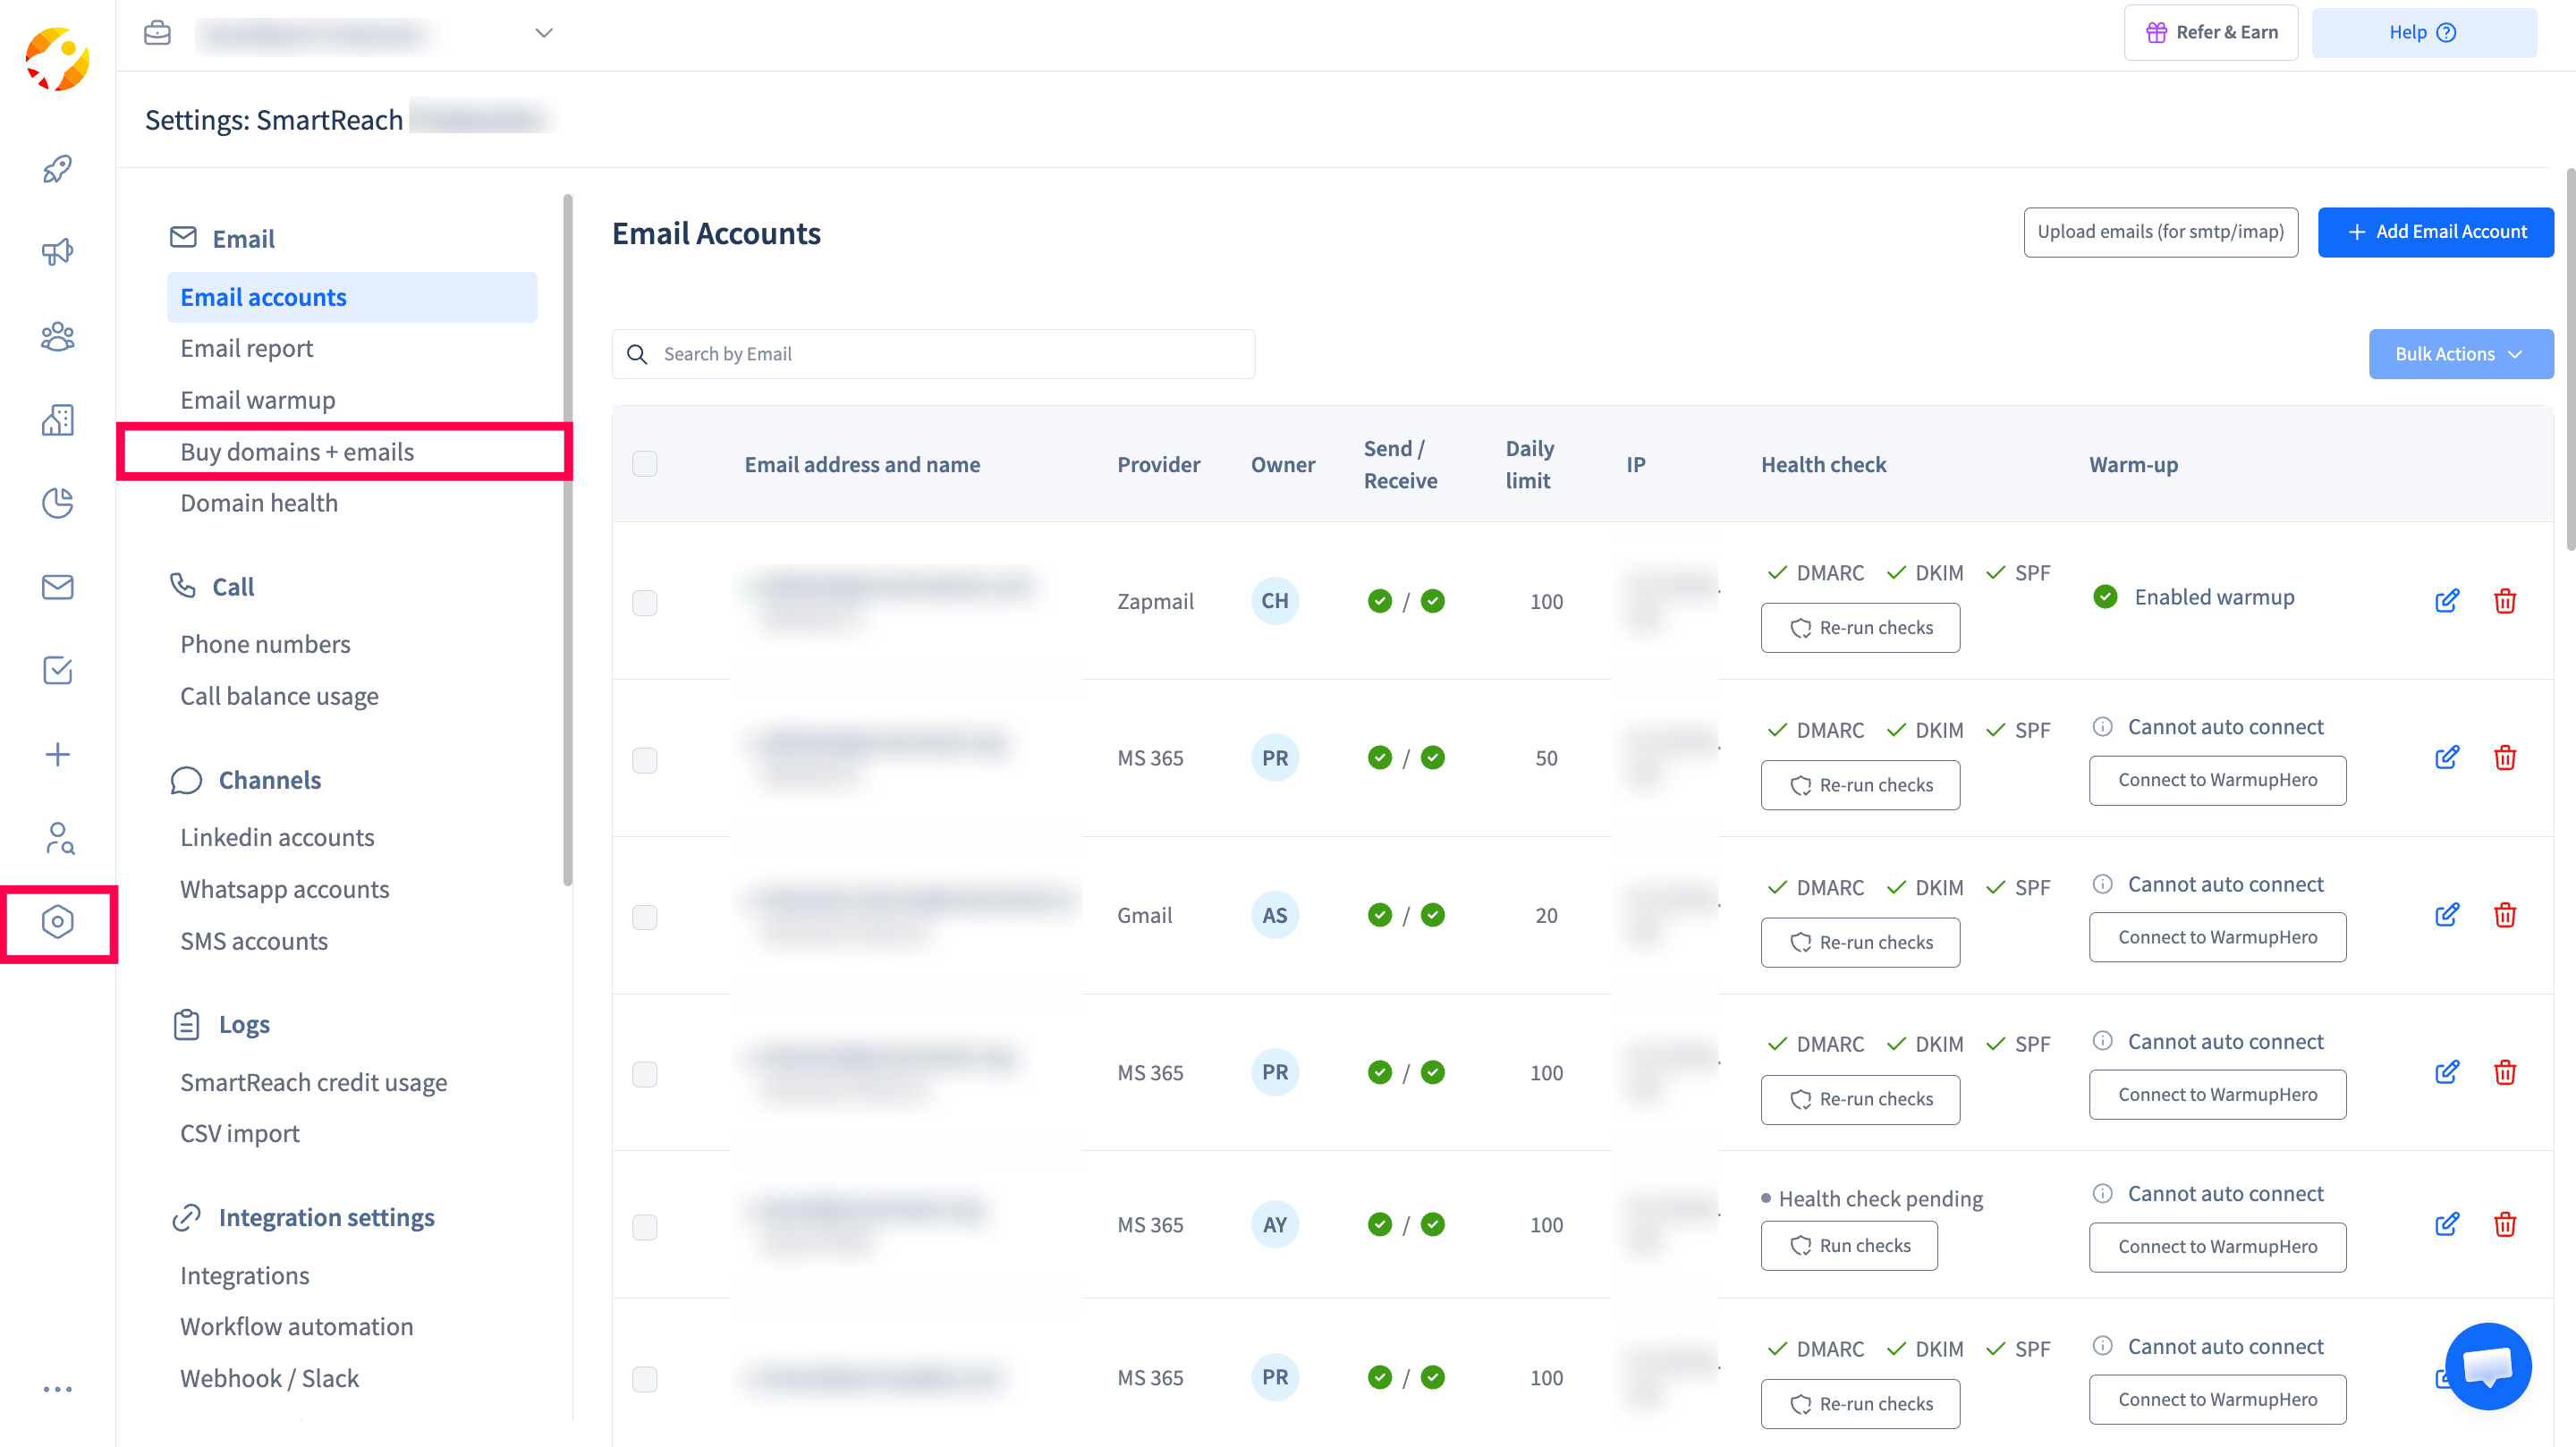
Step 1: Navigate to Buy Domains + Emails
- Go to Settings > Buy Domains + Emails to open the domain and email purchase page.
Step 2: Choose Azure as Your Email Service Provider
- You will see a modal titled “Choose your preferred Email Service Provider” with multiple provider cards. Select the Azure card which shows:
- Managed by: InboxKit
- Domain + 50 Mailboxes: $35/month
- Click Continue with Azure to proceed.
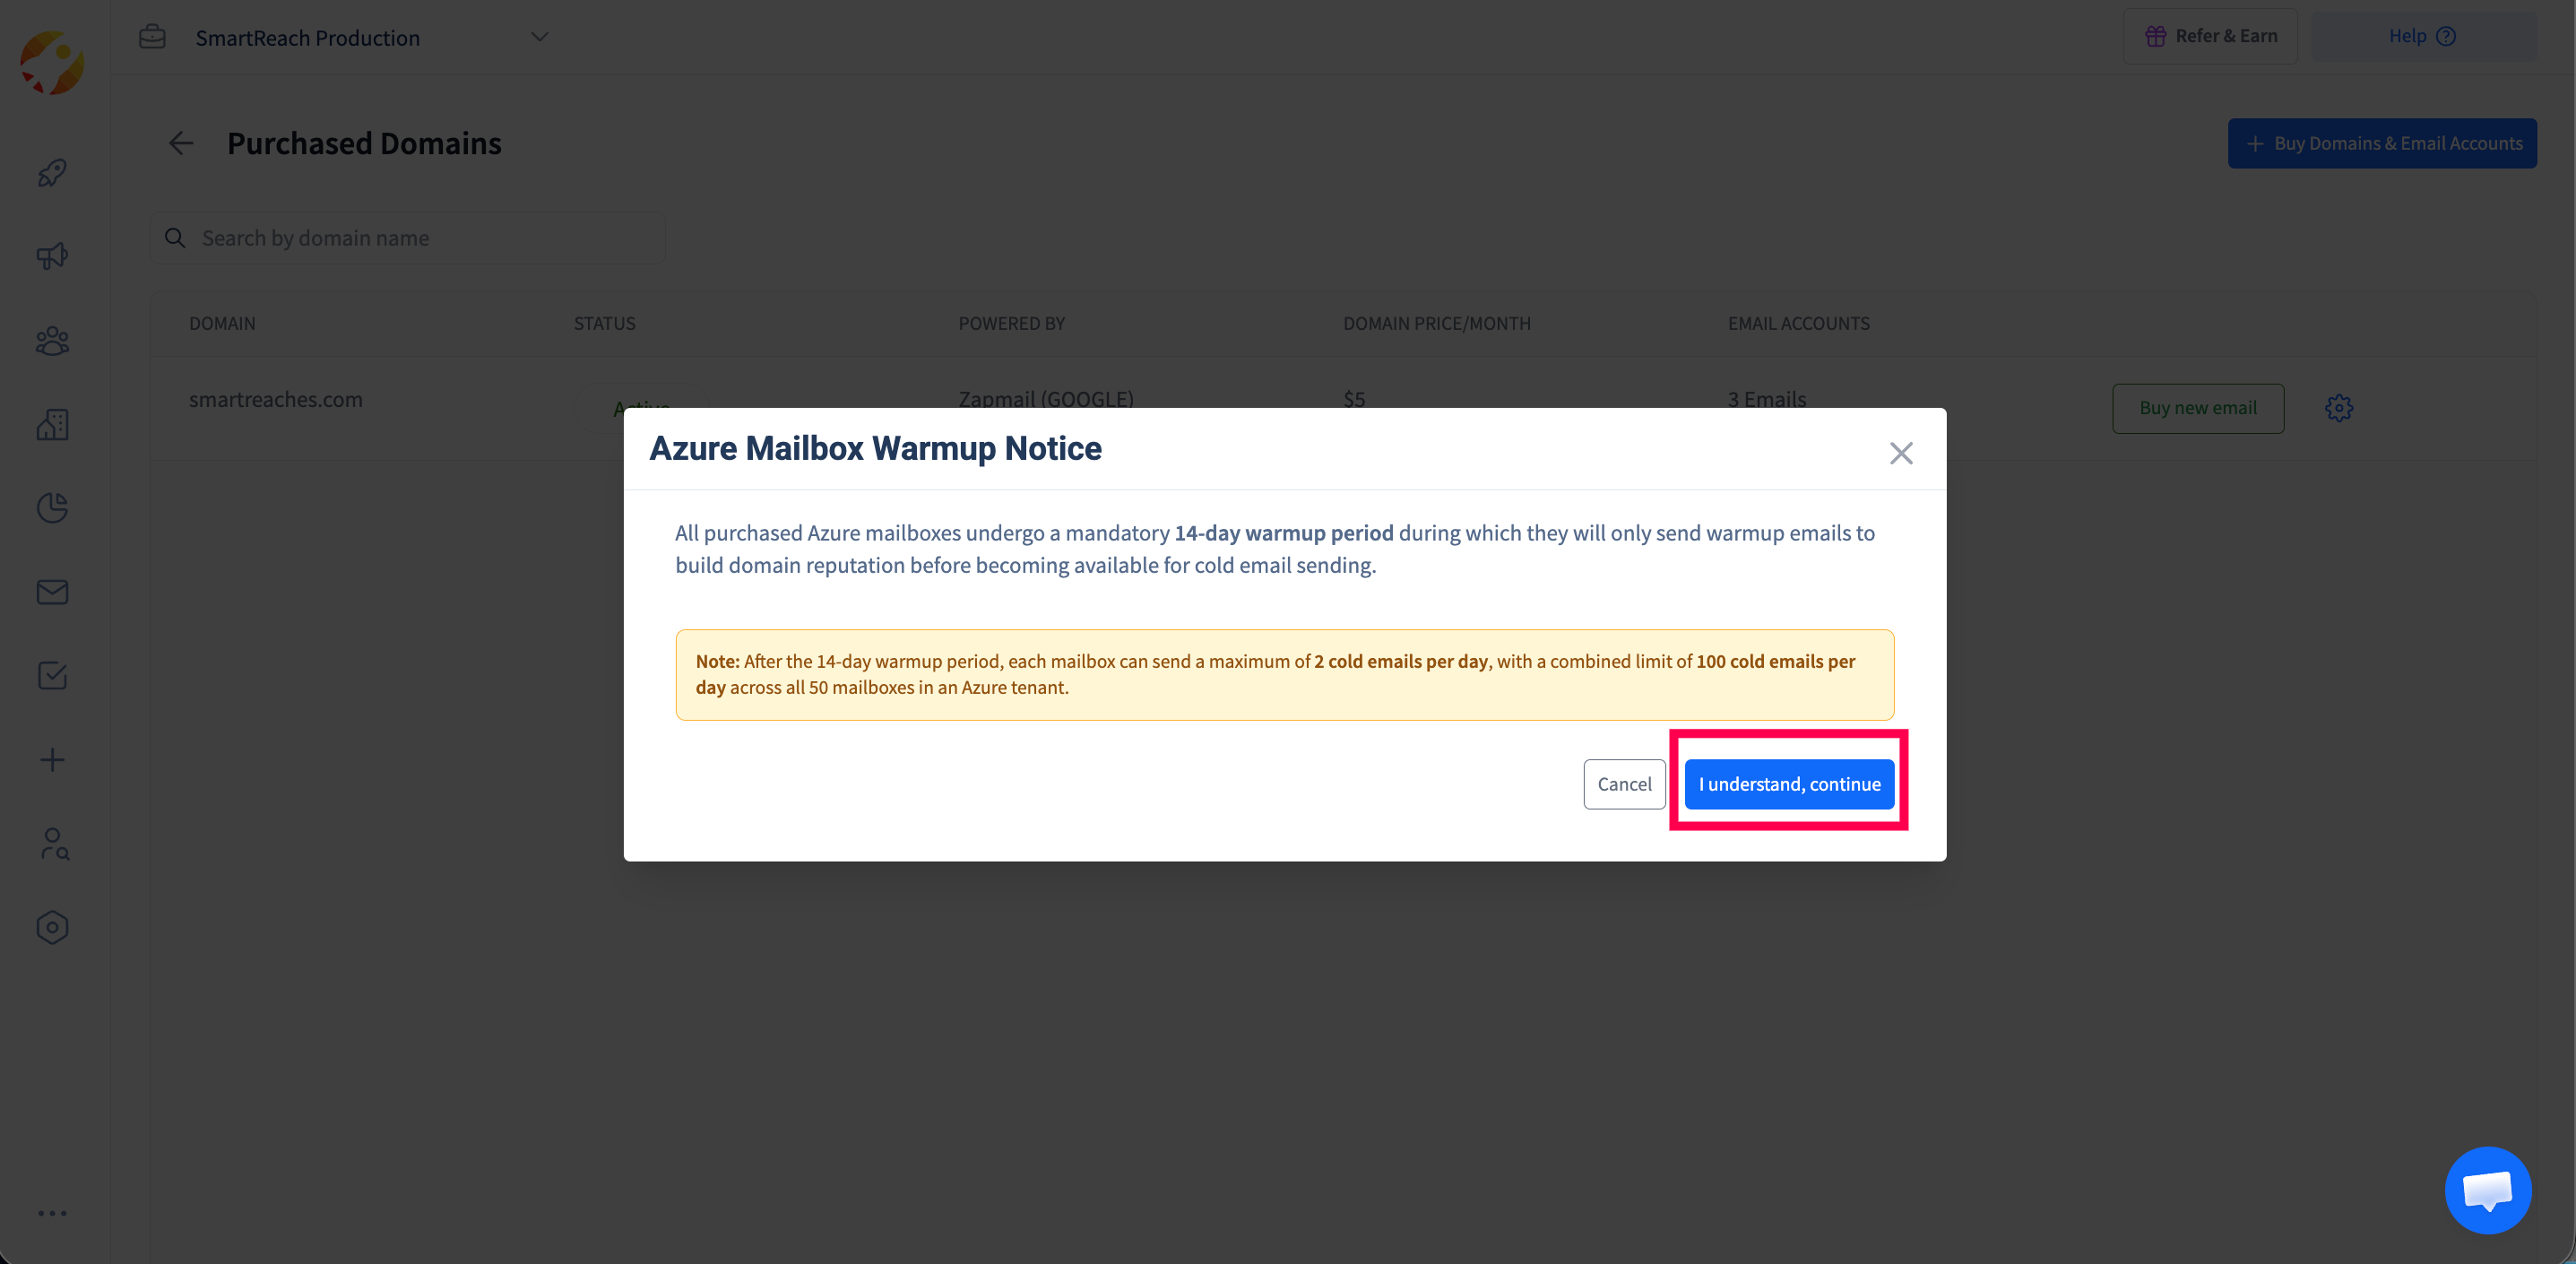
Step 3: Acknowledge the Warmup Notice
- Before proceeding, you will see an important “Azure Mailbox Warmup Notice” modal:
-
All purchased Azure mailboxes undergo a mandatory 14-day warmup period during which they will only send warmup emails to build domain reputation before becoming available for cold email sending.
Note: After the 14-day warmup period, each mailbox can send a maximum of 2 cold emails per day, with a combined limit of 100 cold emails per day across all 50 mailboxes in an Azure tenant.
-
- Click “I understand, continue” to proceed.
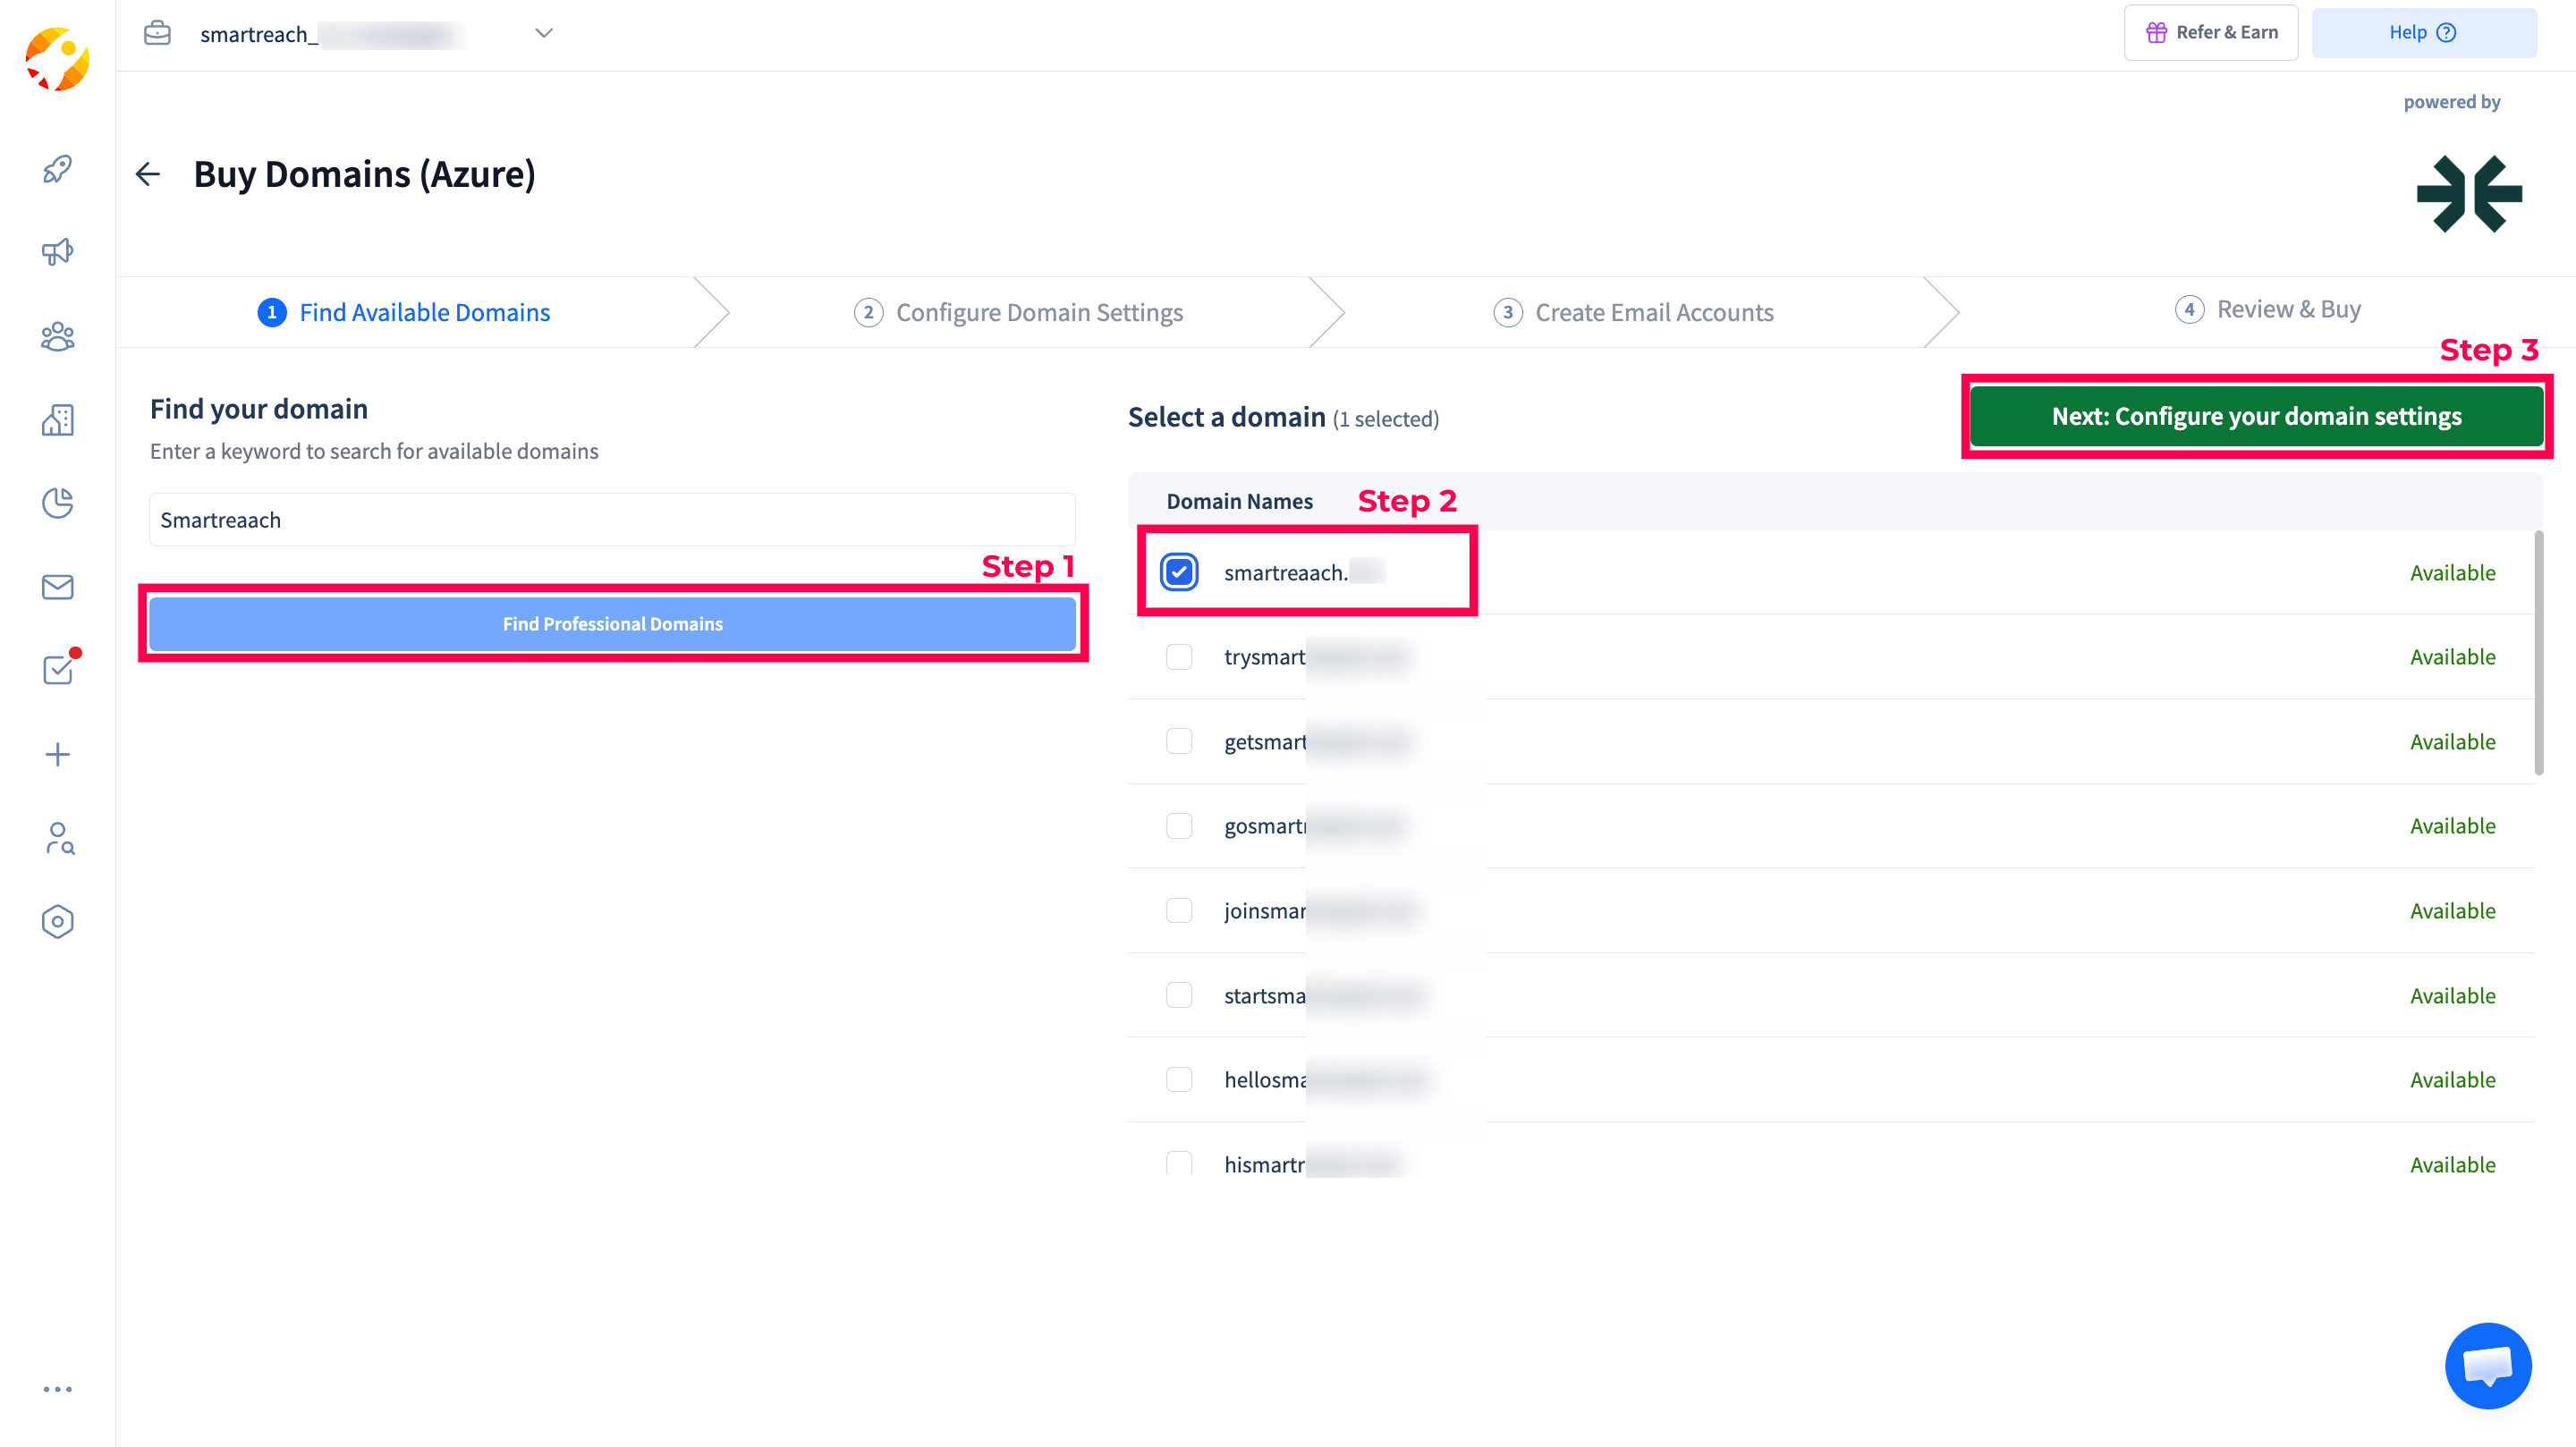
Step 4: Search for Available Domains
- On the “Find your domain” screen:
- Enter a keyword related to your brand (e.g., yourbrand) in the search field.
- Click “Find Professional Domains”.
- Wait while the system checks domain availability (this may take 30-60 seconds).
- The results will show a list of available domains with:
- Domain name(e.g., yourbrand.com, yourbrand.co, yourbrand.net)
- Availability status (Available / Unavailable)
- Premium badge (if the domain is a premium domain)
- Select one domain by clicking the checkbox next to it, then click “Next: Configure your domain settings”.
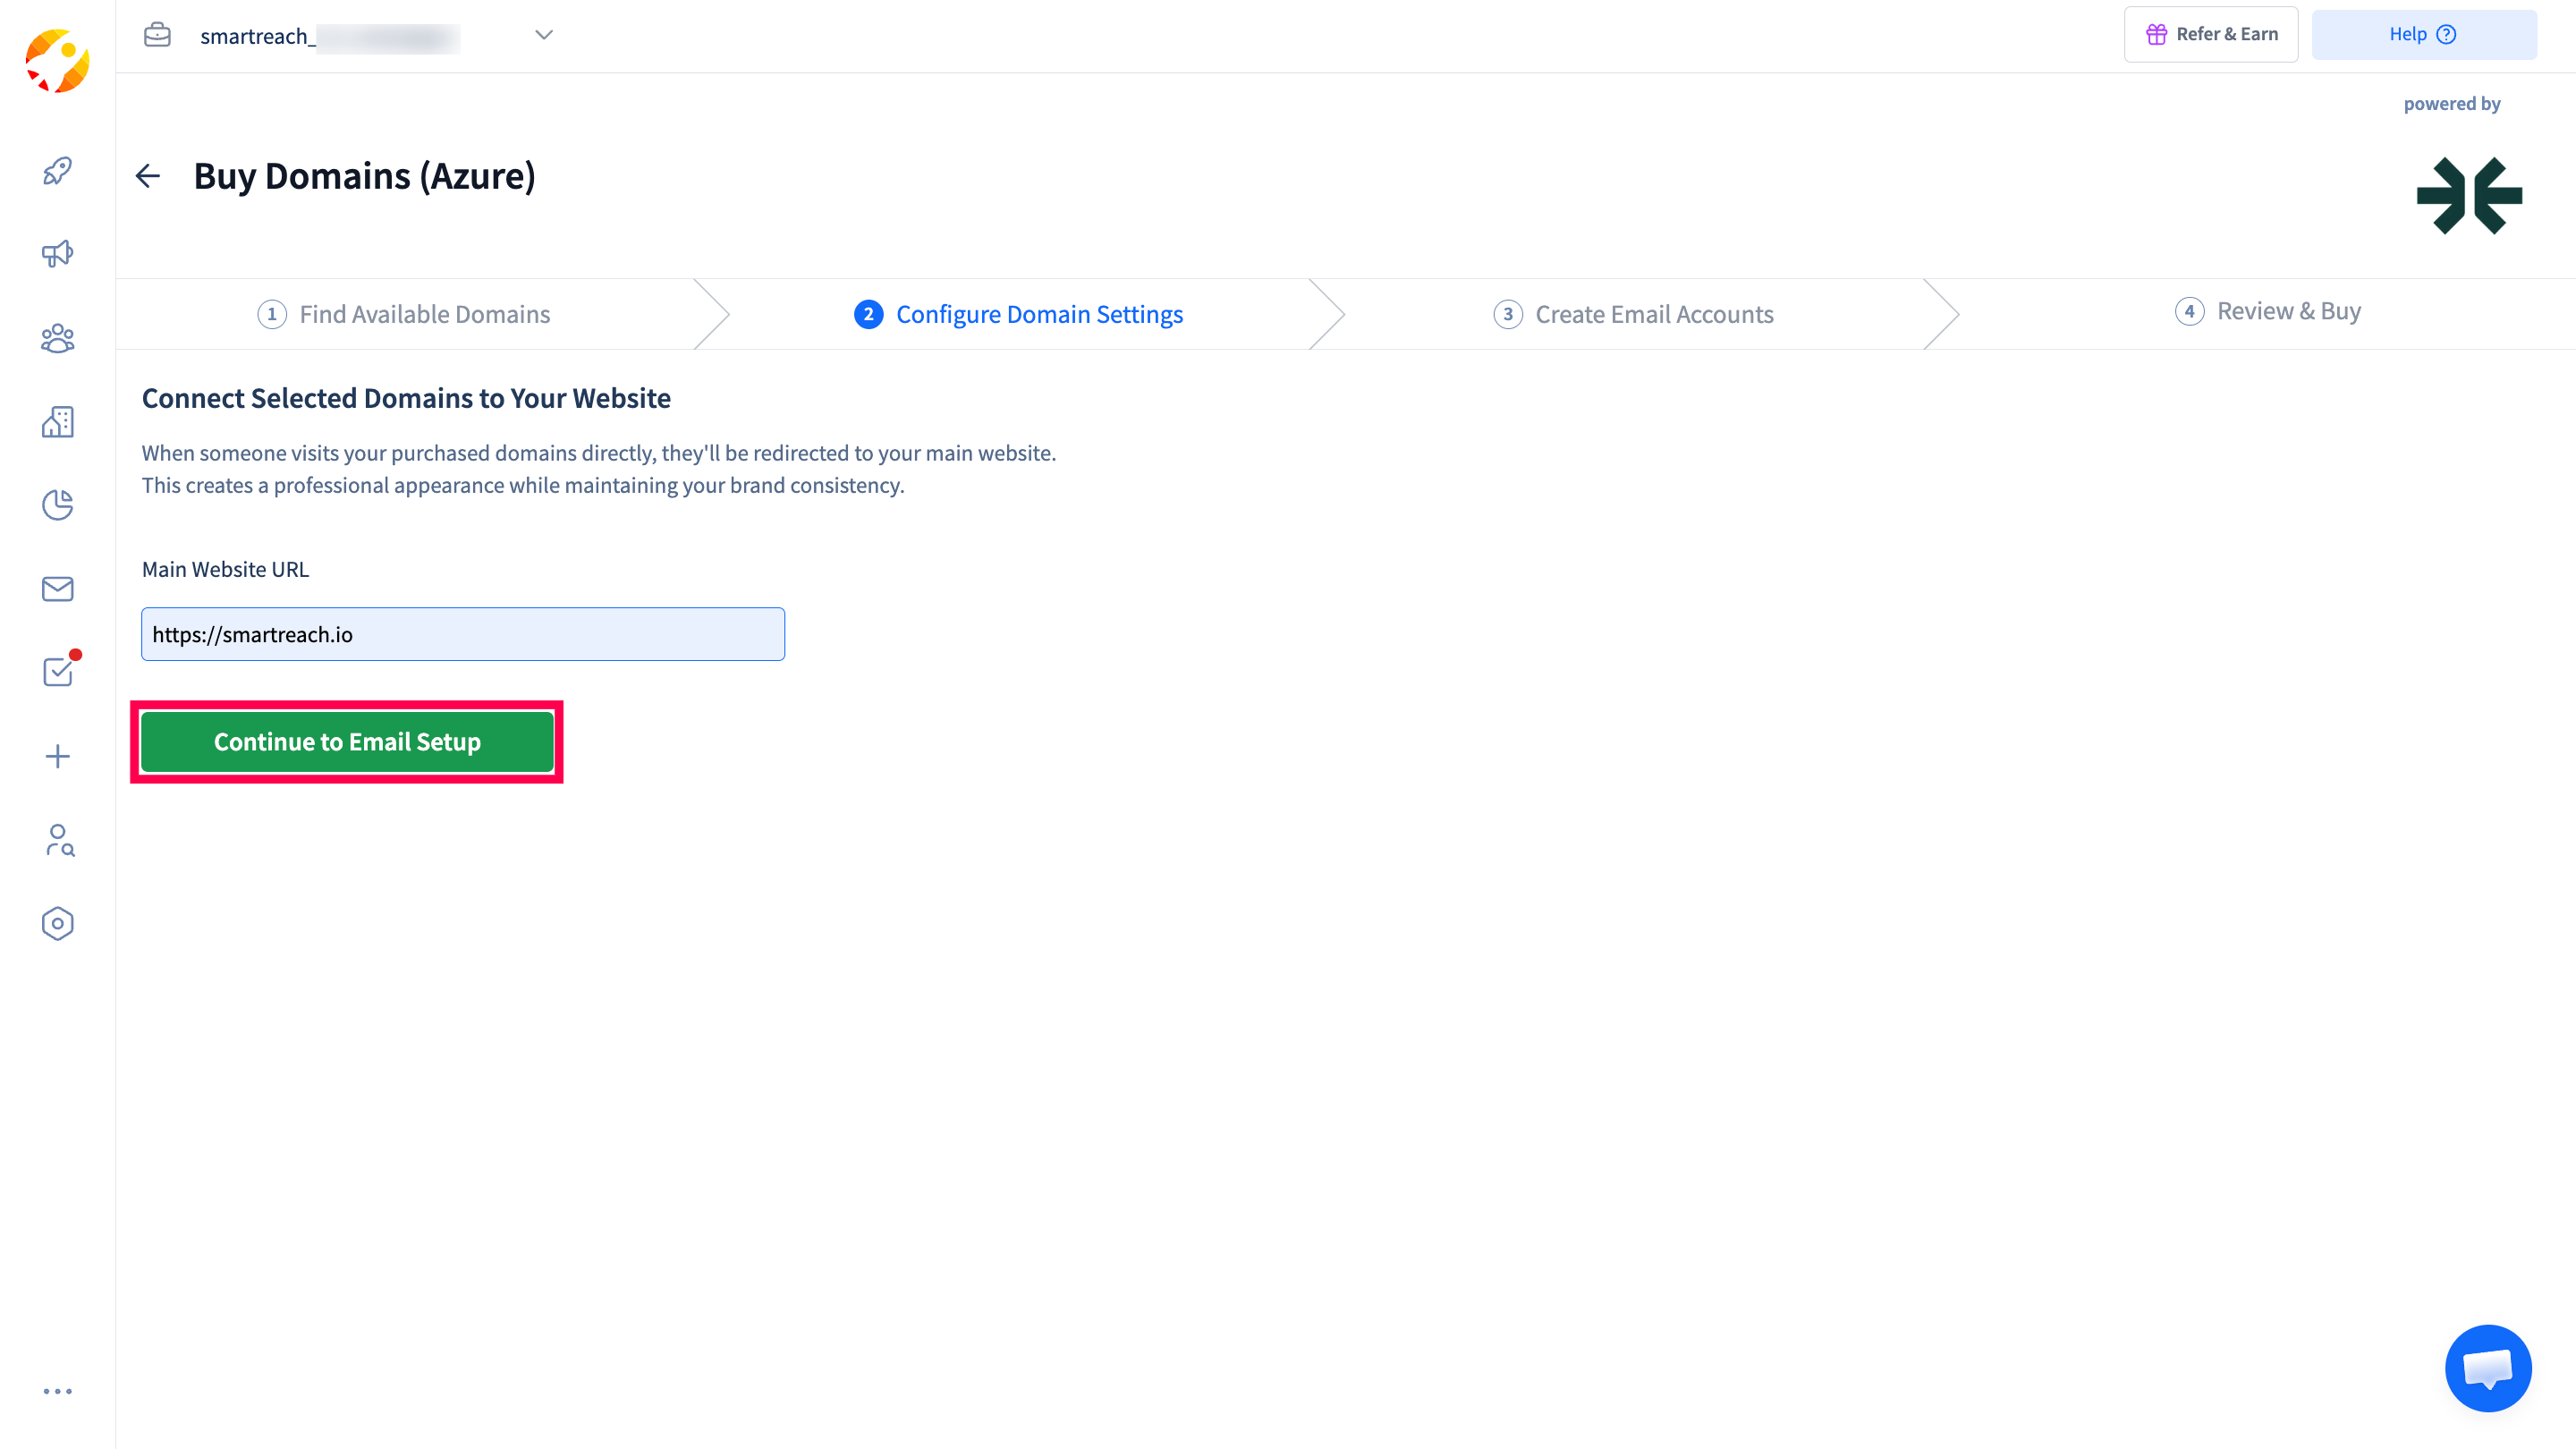
Step 5: Set Your Domain Redirect URL
- On the “Connect Selected Domains to Your Website” screen:
- Enter your Main Website URL (e.g., https://your-main-website.com)
- This URL is where visitors will be redirected if they type your purchased domain directly into a browser
- The URL must include the protocol (http:// or https://)
- Click “Continue to Email Setup” to proceed.
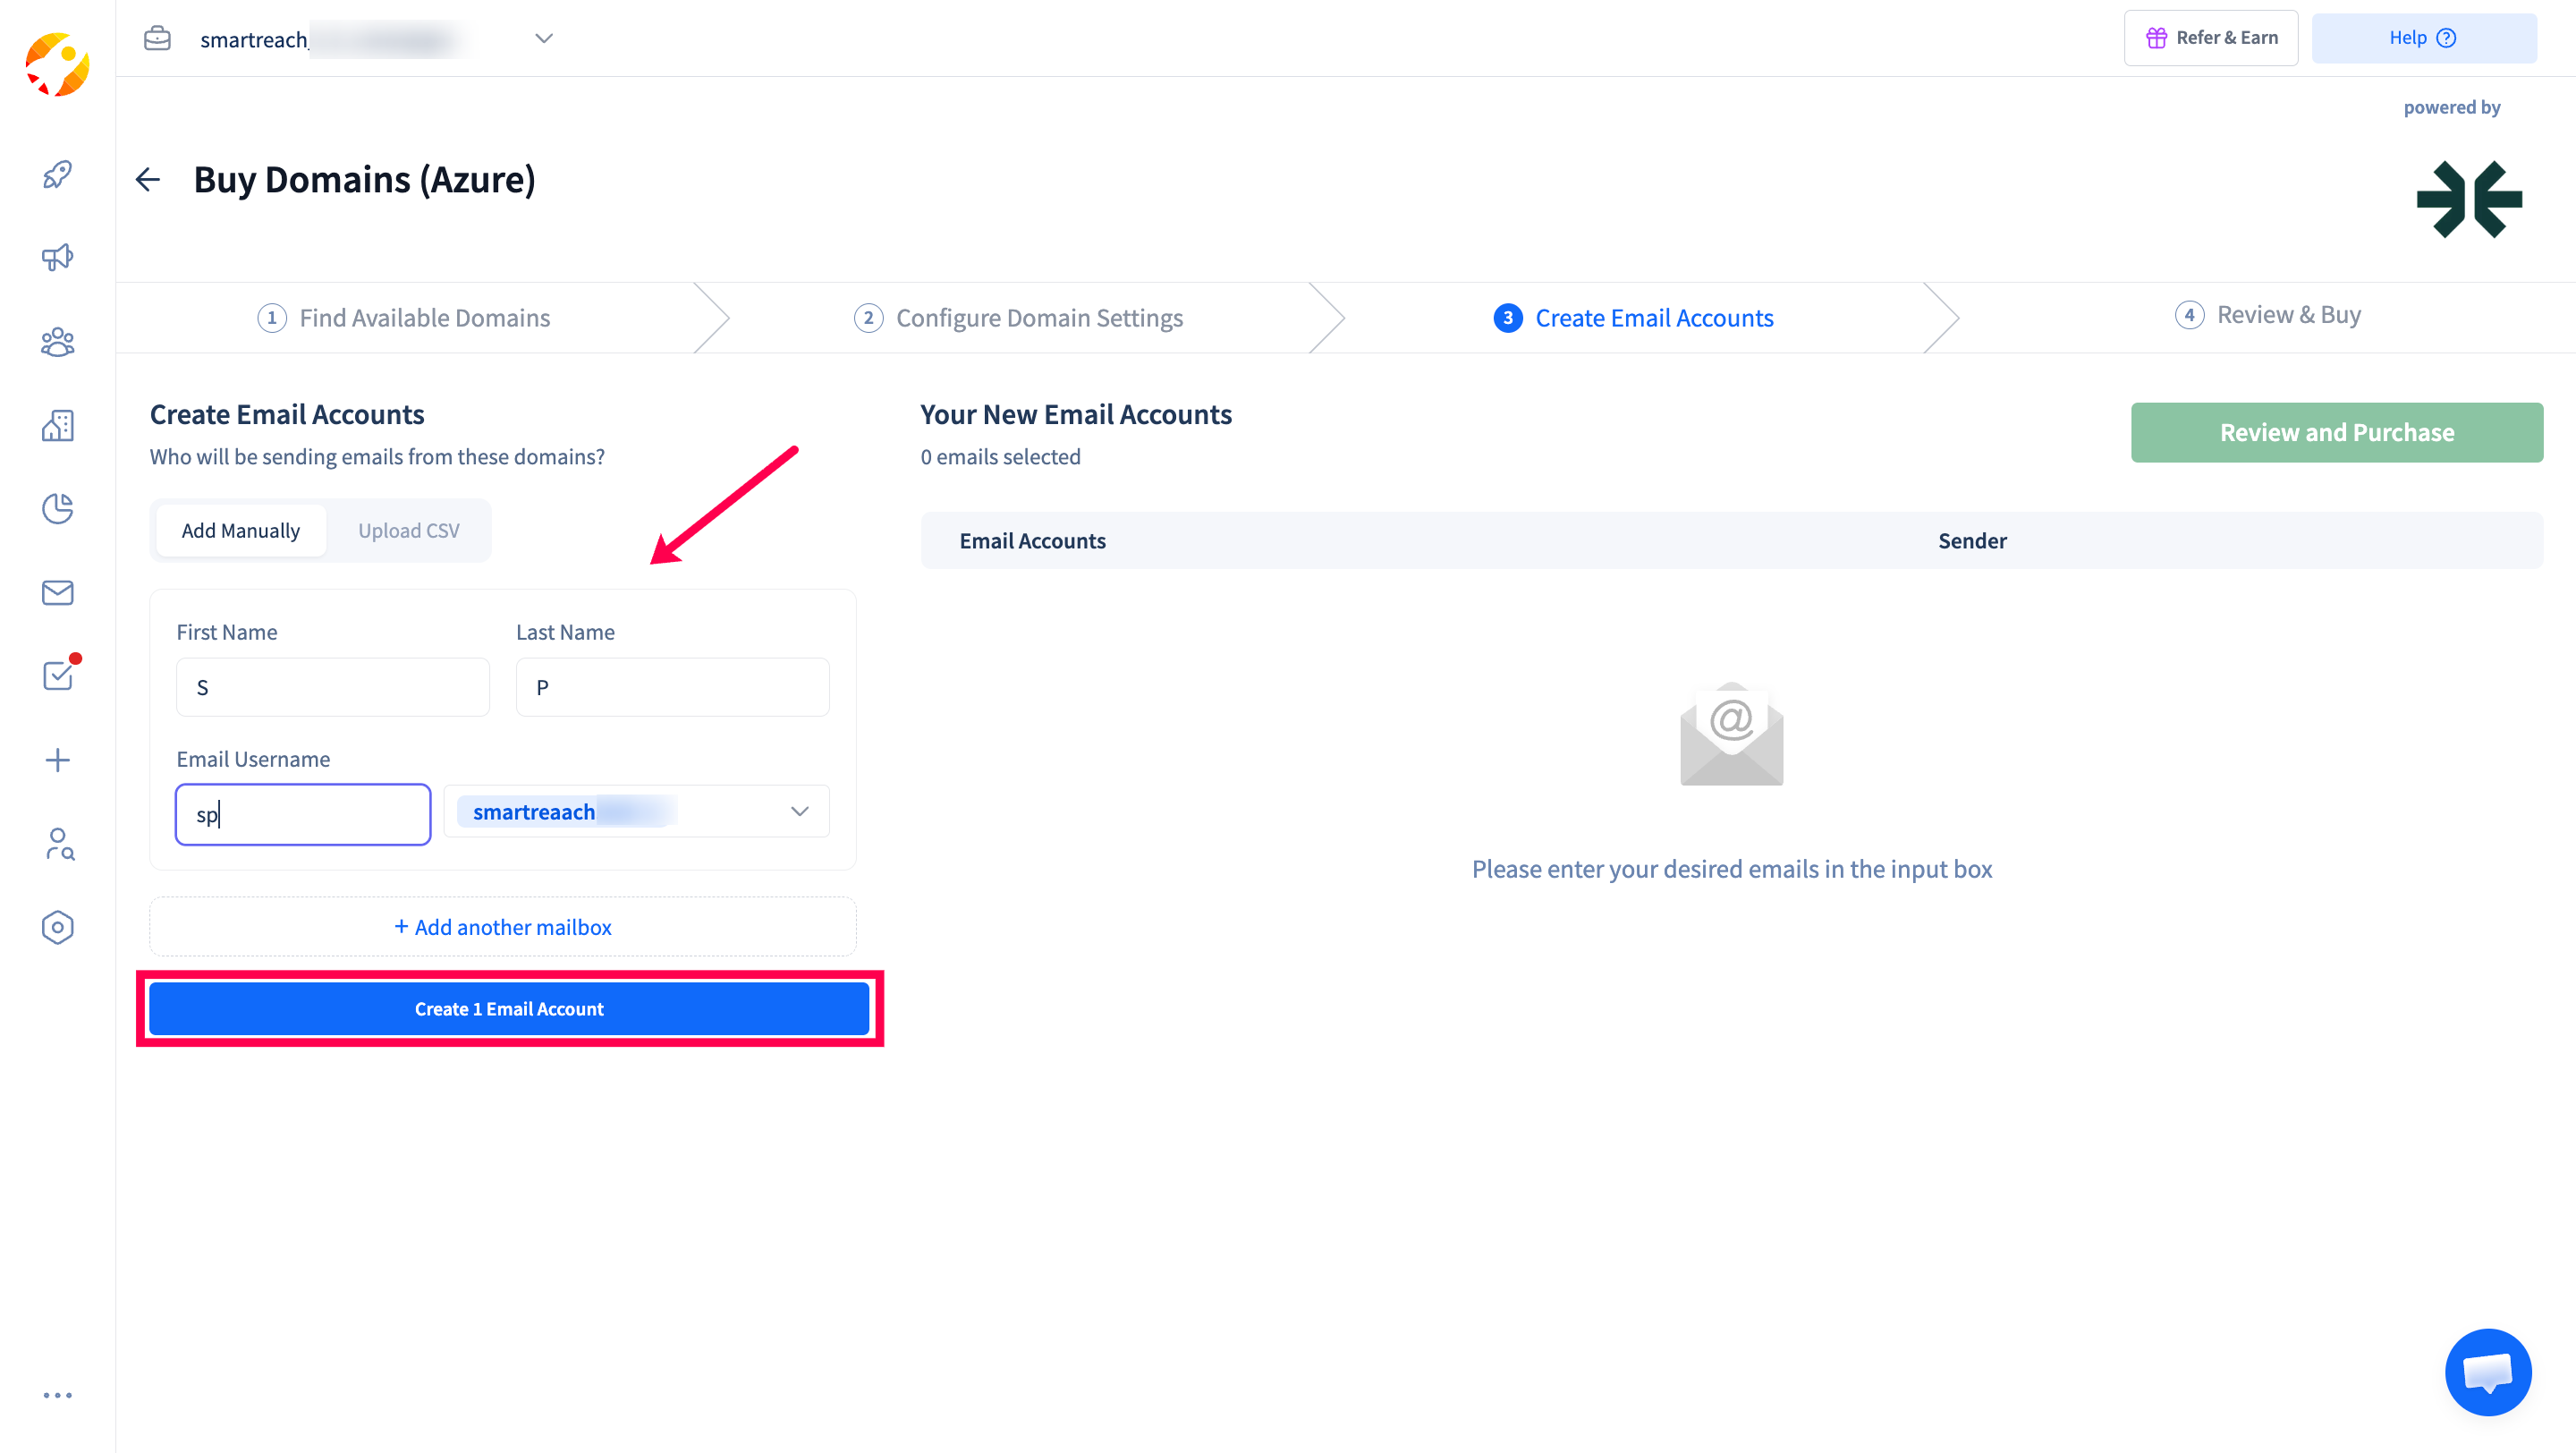
Step 6: Create Email Accounts
- On the “Create Email Accounts” screen, you can add mailboxes in two ways:
Option A: Add Manually
For each mailbox, fill in:
- First Name- The sender’s first name
- Last Name- The sender’s last name
- Email Username - The part before the @ sign (e.g., john.doe for [email protected])
Click “Add another mailbox” to add more mailboxes (up to 50 per domain).
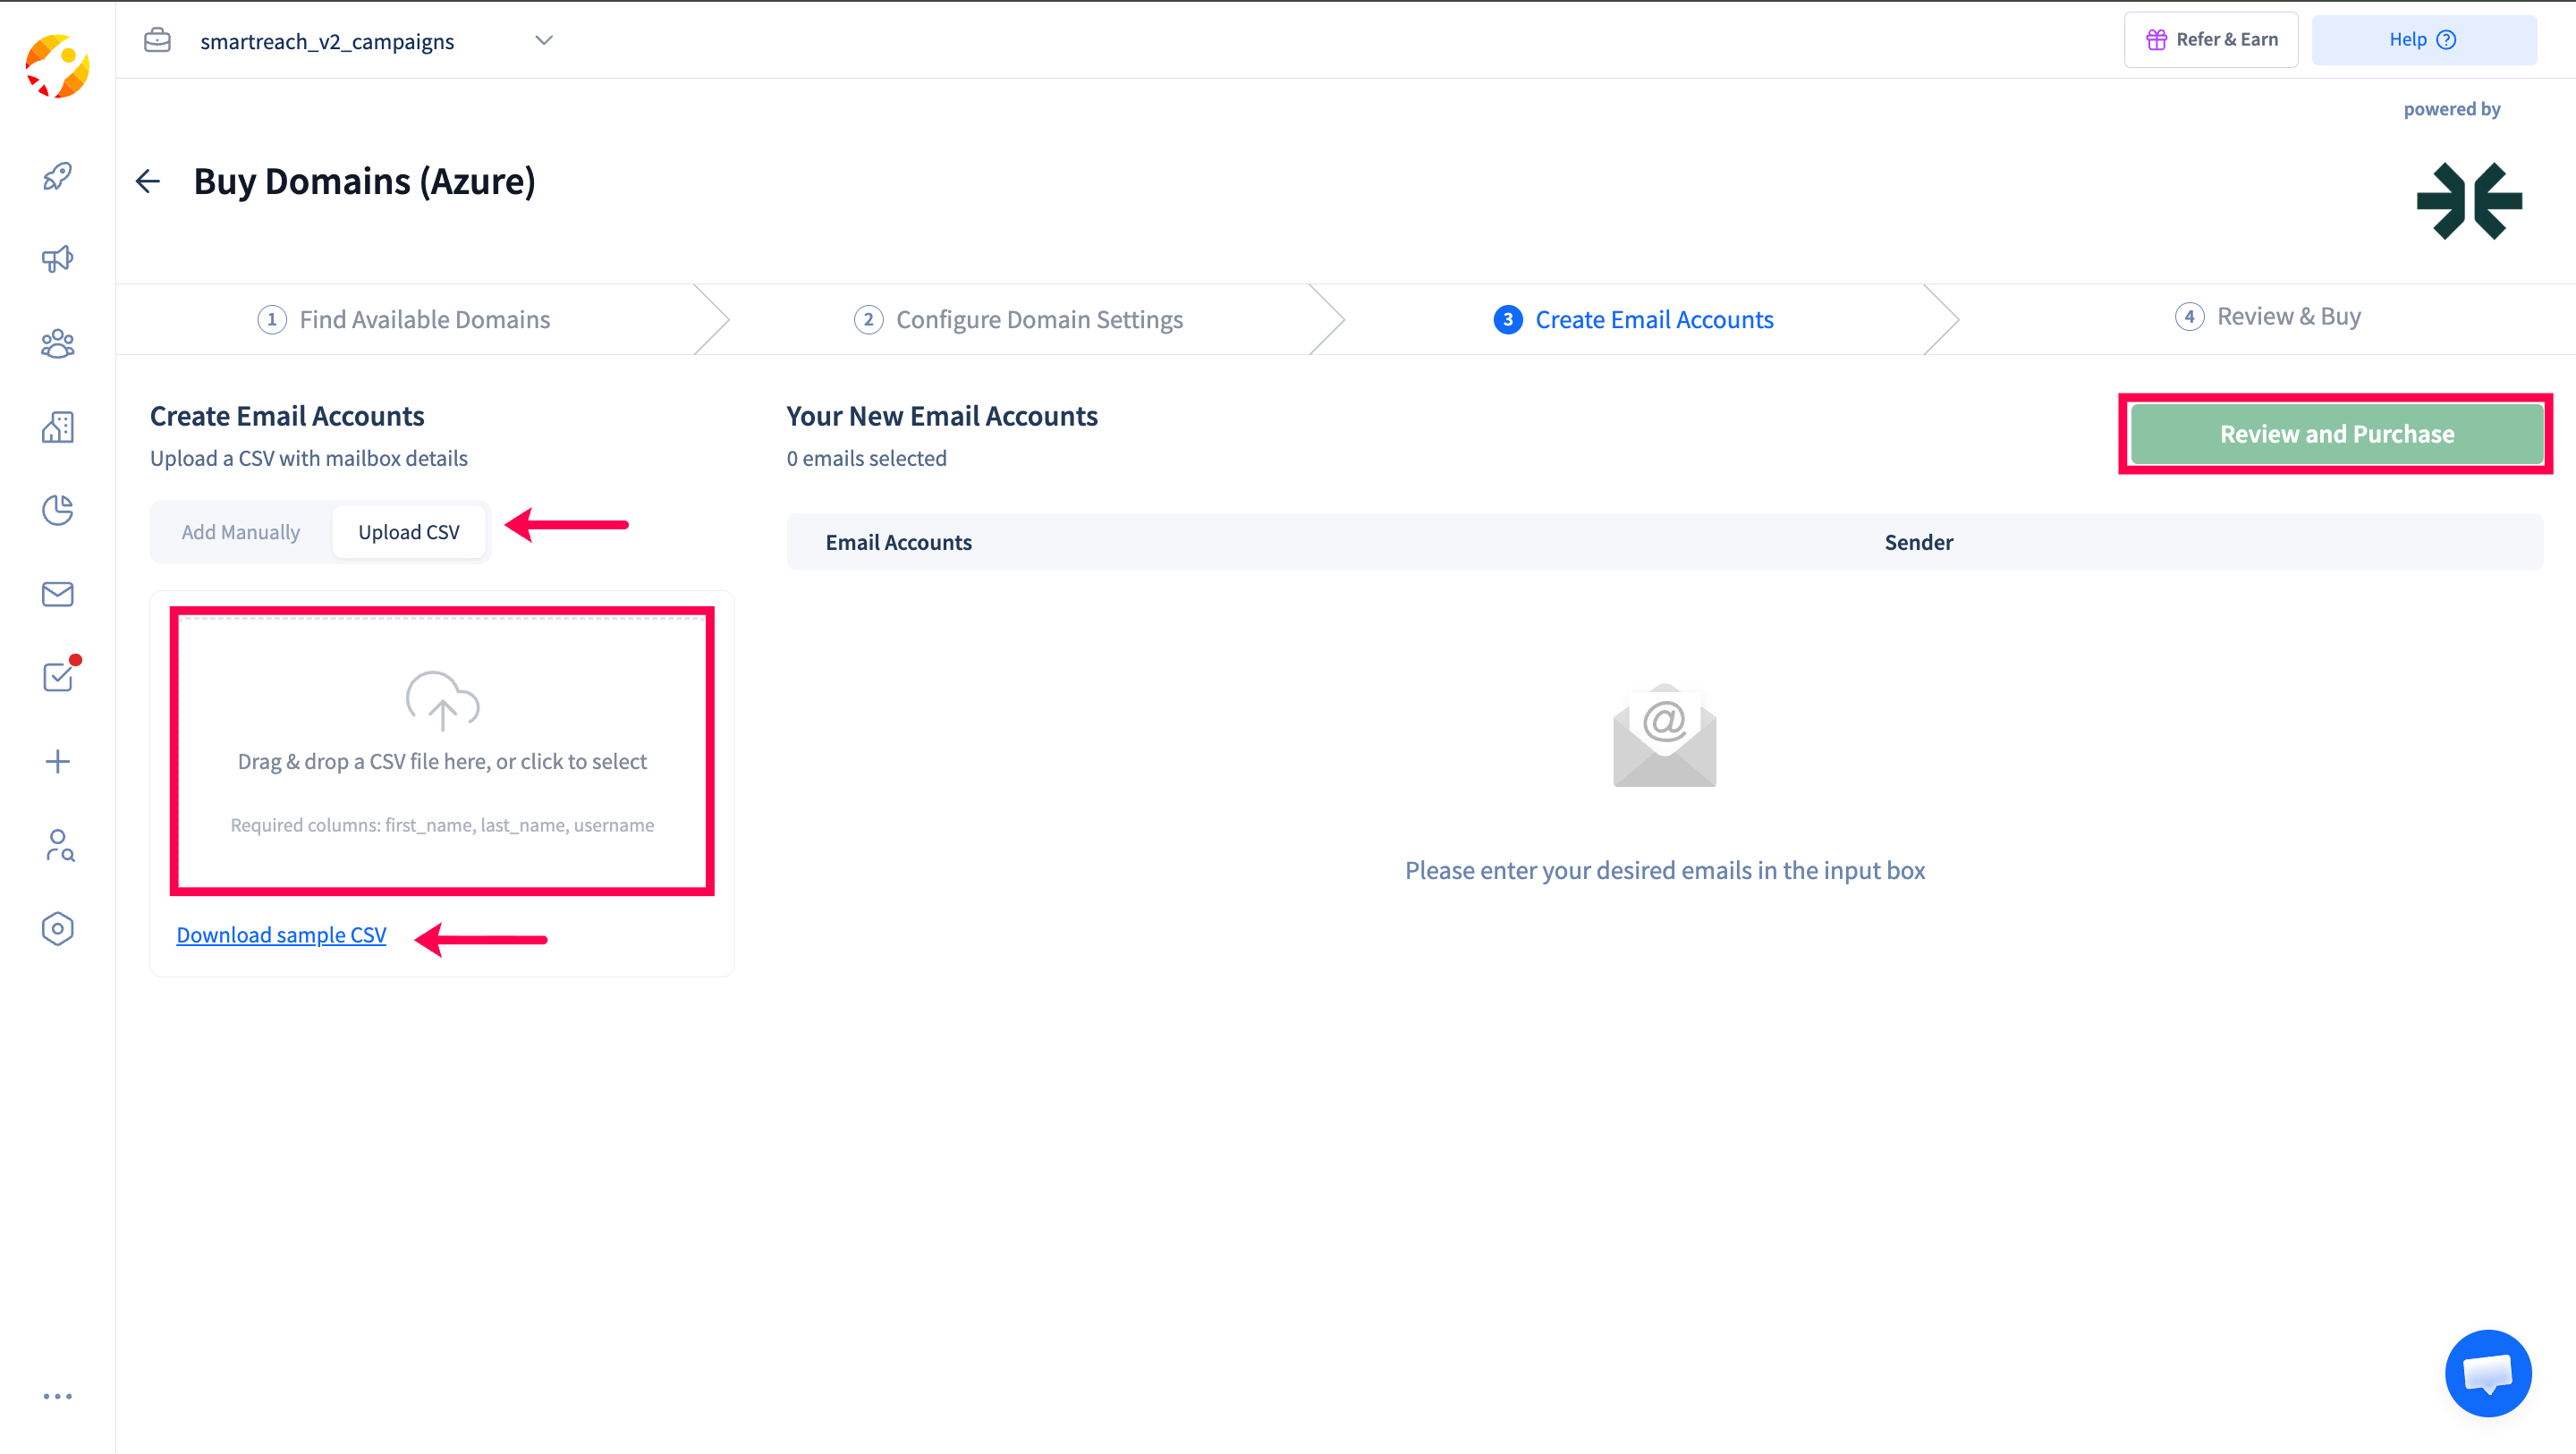
Option B: Upload CSV
- Click the “Upload CSV” tab
- Download the sample CSV template using the “Download sample CSV” link
- Fill in the CSV with columns: first_name, last_name, username
- Drag & drop or click to upload your CSV file
Username rules:
- Lowercase only, no spaces
- Only letters, numbers, dots, hyphens, and underscores allowed
- Cannot start or end with special characters
- Cannot have consecutive special characters
The right panel will show all your added mailboxes under “Your New Email Accounts” with a count (e.g., “10 emails selected”).
Click “Review and Purchase” when you’re done adding mailboxes.
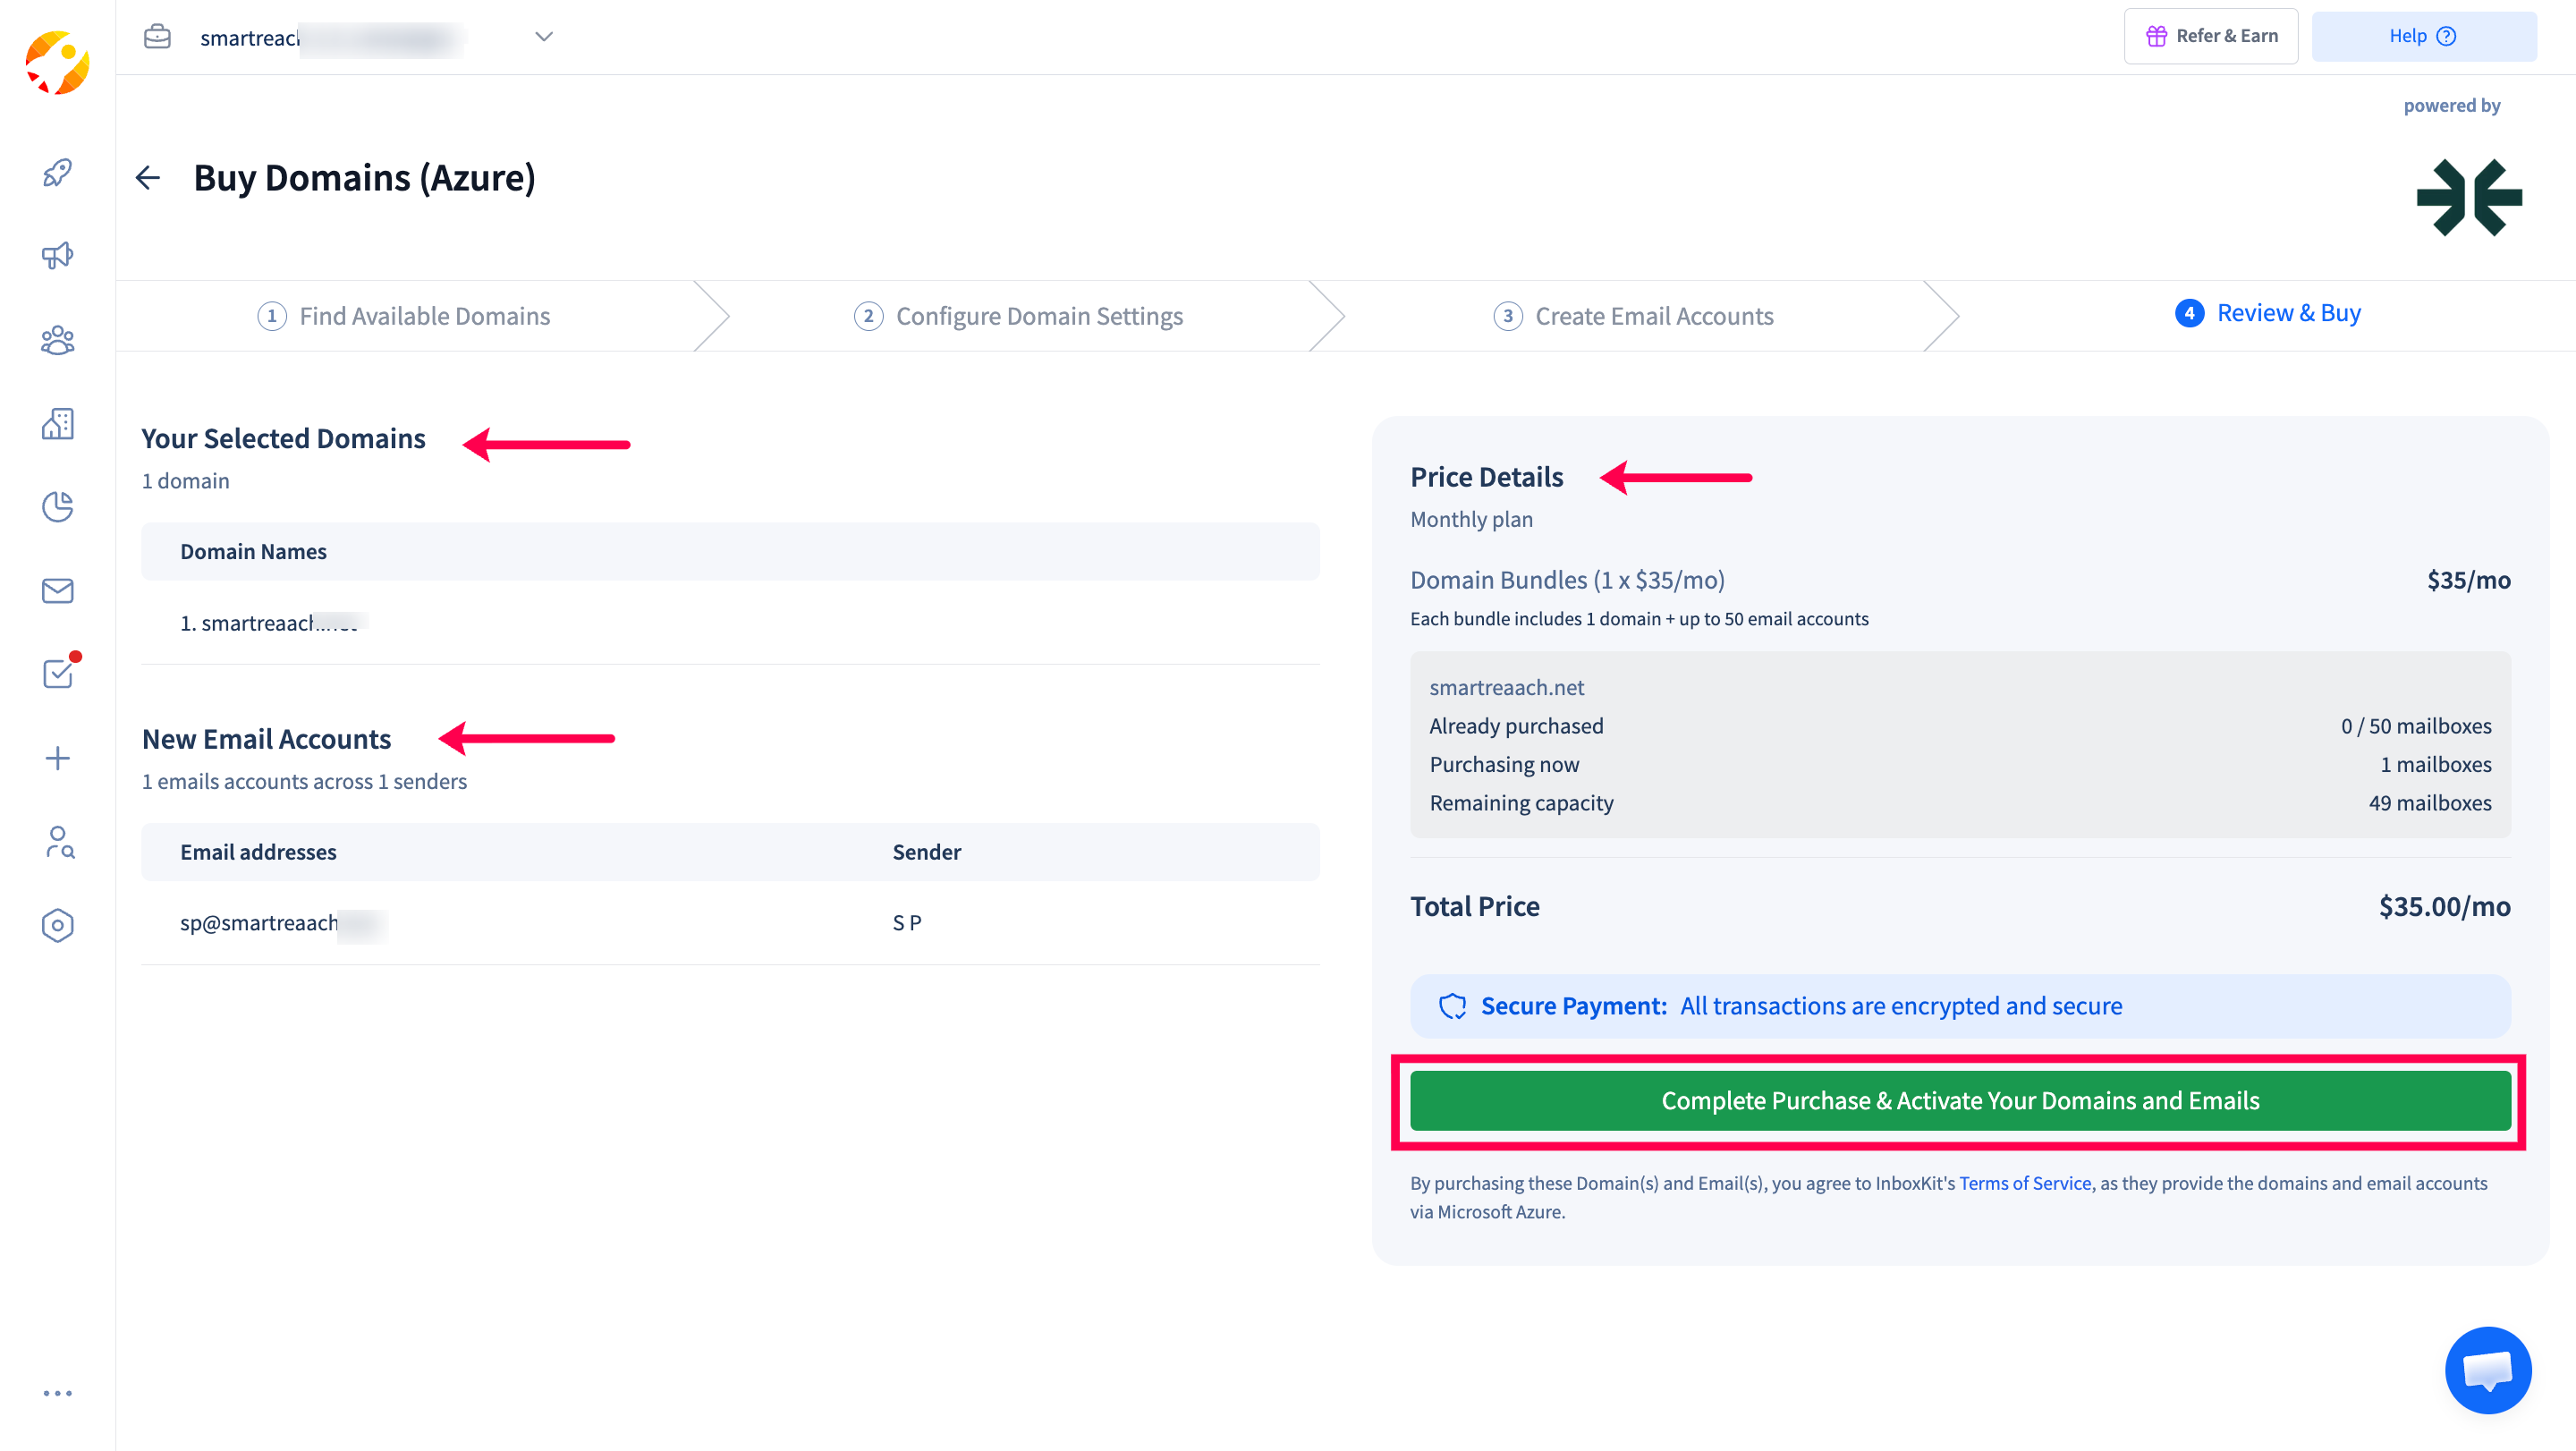
Step 7: Review & Buy
- On the “Review & Buy” screen:
- Verify your selected domain name
- Review the list of mailboxes to be created
- Confirm the pricing ($35/month for domain + mailboxes bundle)
- Click “Purchase” to complete the transaction.
Step 8: Wait for Provisioning
- After purchase, you will see a “Registration in Progress” screen:
- Do not close this page to avoid interruptions
- Domain activation typically takes 30-45 minutes
- Mailbox provisioning can take up to 2 hours
- Once complete, you will see a “Registration Complete!” confirmation with a summary of your purchased domain and mailboxes.
Adding Additional Mailboxes to an Existing Domain
- If you’ve already purchased an Azure domain and want to add more mailboxes:
- Go to Settings > Buy Domains + Emails
- Find your InboxKit Azure domain in the purchased domains table
- Click “Buy new email” on that domain
- You will be taken directly to the Create Email Accounts step (domain search is skipped)
- Add mailboxes manually or via CSV upload
- Review and complete the purchase
Important Information
Warmup Period
- All new Azure mailboxes undergo a mandatory 14-day warmup period
- During warmup, mailboxes only send warmup emails to build domain reputation
- After warmup, each mailbox can send up to 2 cold emails per day
- Combined limit of 100 cold emails per day across all 50 mailboxes per Azure tenant
Provisioning Times
- Domain activation: 30-45 minutes after purchase
- Mailbox provisioning: Up to 2 hours after domain activation
Domain & DNS Management
- No manual DNS setup required - InboxKit automatically configures SPF, DKIM, and DMARC records
- Domain registration and DNS propagation are handled entirely by InboxKit
- Your domain redirects visitors to the main website URL you provided during setup
Account Management
- InboxKit Azure accounts are managed through SmartReach, not directly through Microsoft Azure
- All email sending, tracking, and warmup is handled within the SmartReach platform
Frequently Asked Questions
How long does it take for my domain and mailboxes to be activated?
- Domain activation typically takes 30-45 minutes. Mailbox provisioning can take up to 2 hours after the domain is active. The initial domain search itself may take 30-60 seconds.
Can I purchase multiple domains?
- Yes. Each domain purchase is a separate transaction. You can repeat the purchase process for additional domains. Each domain comes bundled with up to 50 mailboxes.
What happens when someone visits my purchased domain?
- Visitors are automatically redirected to the main website URL you specified during the domain setup process.
Can I cancel my InboxKit Azure subscription?
- InboxKit Azure purchases are non-refundable. These charges are billed separately from your main SmartReach subscription. After cancellation, access is maintained for 60 days.
What type of email accounts are these?
- These are fully managed Microsoft Azure mailboxes provisioned through InboxKit. They are enterprise-grade accounts hosted on Microsoft’s Azure infrastructure.
Can I manage these accounts directly in Microsoft Azure?
- No. InboxKit Azure accounts must be managed through the SmartReach platform. Direct access to Microsoft Azure admin portals is not available for these accounts.
Do these accounts include warm-up tools?
- Yes. All InboxKit Azure mailboxes include automatic warmup through SmartReach’s built-in warmup system. The 14-day warmup period begins automatically after mailbox provisioning.
How is InboxKit Azure different from other providers on SmartReach?
| Feature | InboxKit Azure | Zapmail (Google) | Maildoso (SMTP) |
|---|---|---|---|
| Email Provider | Microsoft Azure | Google Workspace | SMTP/IMAP |
| Pricing | $35/mo (domain + 50 mailboxes) | $5/mo domain + $4/mo per mailbox | Varies |
| DNS Setup | Fully automated | Fully automated | Fully automated |
| Warmup Period | 14 days mandatory | Available via WarmupHero | Varies |
| Mailboxes per domain | 50 mailboxes/domain | 5 mailboxes/domain (Recommended) | 5 mailboxes/domain (Recommended) |
| Daily Send Limit | 2 per mailbox / 100 per tenant/day | 40 - 50 /email/day (Recommended) | 40 - 50 /email/day (Recommended) |
| Domain Activation Time | 30-45 minutes | ~10-15 minutes | Varies |
| Mailbox Provisioning Time | Up to 2 hours | ~10-15 minutes | Varies |
| Mailbox Creation | Manual or CSV upload | Manual | Manual |
| Edit Email Account | Not available | Available | Not available |
What if my domain search doesn’t show any results?
- Try different keywords or variations of your brand name. The system searches across multiple TLDs (.com, .co, .org, .net, .info, .shop, etc.) automatically.
Can I upload a profile picture for my Azure email accounts?
- No. Profile picture upload is currently only available for Zapmail (Google Workspace) accounts. This feature is not supported for InboxKit Azure accounts.
Can I edit my Azure email account details after purchase?
- No. Editing email account details (name, profile picture) is currently only available for Zapmail (Google Workspace) accounts. InboxKit Azure email accounts cannot be edited after creation.
What are the username format requirements for email accounts?
- Must be lowercase
- Only letters, numbers, dots (.), hyphens (-), and underscores (_) are allowed
- Cannot start or end with a special character
- Cannot contain consecutive special characters (e.g., john..doe is invalid)
- No spaces allowed
Troubleshooting
Domain search is taking too long
- Domain availability checks may take up to 60 seconds. If the search exceeds this time, try refreshing the page and searching again with a different keyword.
Purchase stuck on Registration in Progress
- Domain activation can take 30-45 minutes and mailbox provisioning up to 2 hours. Do not close the page during this process. If it takes significantly longer, refresh the page and check your domains list under Settings > Buy Domains + Emails to see if the domain was successfully provisioned.
Mailboxes not appearing after purchase
- Azure mailbox provisioning is asynchronous and can take up to 2 hours. Check your email accounts list periodically under Settings > Buy Domains + Emails.
Warmup emails not sending
- Ensure your SmartReach account has warmup enabled. The 14-day warmup period starts automatically after mailbox provisioning. Check your warmup settings under the email account configuration.
Updated about 1 month ago